OVERVIEW
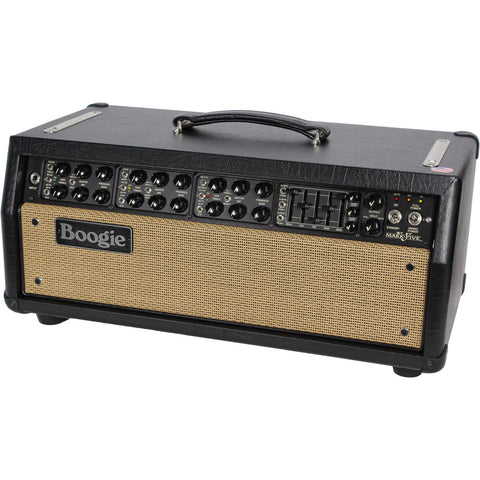
The MARK V is really a collection of amplifiers. There are far too many circuits and sounds to think of it as merely an amp. It is also a living history of our company. From the groundbreaking MARK I that introduced the world to high-gain with it's cascading pre amp, to the Mark II - the world's first high gain Dual Mode Channel Switching amplifier and it's later siblings that introduced Simul-Class power. From the MARK III that ushered in the era of 3 Channel footswtching performance, to the MARK IV which gave all this power individual control, the MARK V is the embodiment of the last 40 years of guitar amp history.
Formats Available: Medium Head (Width 22-7/8 inches) // 1x12 Combo, C90 Speaker, Casters
PREAMP
Three distinct Channels present the 3 footswitchable sounds in a simple to dial platform, but don't let that fool you, beneath each set of controls lies another layer of performance. Each preamp Channel contains 3 distinct Modes that are controlled by a simple mini-toggle MODE switch found in the upper left corner of each Channel. This switch is responsible for the voicing of each Channel. In some cases these voicings are related by style and give you important musical differences within a gain structure and sonic theme. In other cases, both gain and EQ are radically altered to achieve drastically different sounds - yet these sounds appear on the same set of controls. This is a result of needing a certain circuit architecture and Tone control string to achieve a particular sound style. Sometimes these extreme mode differences require different Gain and Tone control treatments to achieve a recognizable and iconic sound. In other words, it may require some dialing of the controls when you are touring through the modes. With circuits capable of these extremes, there is simply no way to avoid this. Don't worry though, with what you learn in this manual combined with using your ear - you will quickly learn to choose a mode and dial it up to your needs in seconds.
CHANNEL I contains the lowest gain sounds of the three Channels and can be thought of as the Rhythm or Clean channel. The other two channels contain modes that work better for soft clip, medium crunch and high gain rhythm work. There is a tight, skinny CLEAN (toggle up), a warm, rich FAT clean sound with added lower fundamental (toggle center) and a higher gain pushed version of this architecture found in TWEED (toggle down). A Channel-global BOLD voicing switch adds punch and cut starting in the high mids to help you stand out in a dense mix and give you an increase in headroom.
CHANNEL 2 is the transitional channel between the low gain sounds of channel 1 and the high gain fury of channel 3. This channel contains the biggest differences between modes and there is definitely dialing required as you toggle through the voicing Modes. A stripped, British-inspired EDGE (switch up) unleashes low to mid gain aggression. Low mids are added for a thicker, throatier CRUNCH sound that travels up the gain scale while retaining a tight attack. And finally, MARK I flips the architecture to arrive at the iconic high gain voice that put MESA on the map back in 1970 with the little Boogie amp. This creamy voice is infused with thick bottom end and works great for fattening up single note solo sounds. You may want to run the BASS control very low (off to 10:00) when the GAIN is high in this mode to retain the best attack characteristic and avoid flubbiness. There is also a NORMAL/THICK switch that affects the MARK I Mode only to add extra gain in the mids for added single note focus.
CHANNEL 3 goes on from there to encompass the best of the MARK Series Overdrive sounds. Beginning with the MK II C+ (switch up) the sound is pure, blistering focus and this is the classic Boogie voice of the 80's that became the foundation for players like John Petrucci, James Hetfield, Kirk Hammett, as well as a staple for L.A.'s first call session players of the day Steve Lukather, Mike Landau, Dean Parks and many more.
The classic V curve on the Graphic EQ became an integral part of this sound and went on to be the sound of choice for some of the hardest hitting Punk and Hardcore bands of the 90's and 2000's and is still currently used by many top acts. The original II C'S bring many times their original selling price - if you can find one - and this faithful recreation of that burning sound is the cornerstone of channel 3. The MARK IV is also represented here in FAT (toggle center) where a dose of thick midrange gain is added combined with a rounding out of the upper harmonic peak. Finally EXTREME (switch down) unleashes all the aggression and attack of this circuit for a full gain assault that cuts through any mix. (Beware, the volume jumps up when EXTREME is selected.) There is also a NORMAL / BRIGHT switch included that affects all three Modes in channel 3.
EQUALIZER
The on-board 5 Band Graphic EQ has been an iconic trademark of MARK Series Boogies since they first appeared on the MARK I back in 1970. The shaping power of this feature can't be denied, especially when combined with the MARK II's tight, focused gain sound. In the '80's the classic "V" setting of the EQ on MARK II and III models became a new sound in Heavy Rock and etched the on-board Graphic a place in Rock history.
While the MARK V Tone Controls are accurate and effective over a wide range, they come earlier in the signal chain and can only achieve so much shaping before they produce possible imbalances in certain Modes. (One example might be the Bass Control in Channels 2 and 3 - where in the MARK I and MARK II-C Modes - too much bass dialed up early in the preamp will cause the sound to be tubby and unfocused.
The Graphic EQ comes at the very end of the signal chain so you can shape the final sound with the only consideration being how much of a certain frequency your speakers, cabinets - and ultimately your ears - can handle. (Extreme settings of the two lowest Bands - 80Hz and 240Hz will use up power quickly and overall headroom will be affected, especially in the 50W and 10W settings of the Channel Power switch).
Each Channel is fitted with a mini-toggle to select the 5 Band Graphic EQ, but the fun doesn't stop there. The MARK V gives you the choice of two ways to utilize the power of the Graphic EQ for each Channel!
The mini-toggle within each Channel (center mini-toggle) allows you to decide whether you want the EQ on all the time in that Channel - EQ ON (toggle up), off all the time in that Channel - EQ OFF (toggle center), or activated by the EQ button on the Footswitch - EQ FTSW (toggle down).
A separate mini-toggle for each Channel located in the left side of the Graphic EQ section allows you to select whether you will use the actual SLIDERS (toggle up) to shape your individual EQ curve or, a PRESET contour (toggle down) based on the ever- popular "V" curve. The PRESET Mode is fitted with a PRESET DEPTH control that allows you to dial in the right amount of the PRESET contour for each Channel's sound. For example, you might want to use the SLIDERS selection on Channel 3 to craft your own signature lead sound and two different mixes of the PRESET setting on Channels 1 and 2 for your clean rhythm and crunch sounds.
The ability to choose between these two options when assigning the Graphic EQ to your sounds gives you ultimate flexibility when dedicating the Channels. By combining subtle blends of the Tone controls with the EQ options, virtually any sound you can imagine is at your fingertips. Shaping power like this is what the MARK V is all about and another reason to smile, knowing you've made an investment in your long-term musical journey. This is one instrument that can keep pace and grow with you as you evolve, helping you to reach your full potential as a player.
POWER: MULTI-WATT
The bottom 3 position mini toggle in each Channel (lower left corner) is the MULTI-WATT Power feature that determines the amount (wattage) and type (configuration) of power each preamp Channel will be coupled with to create a classic sound. Any amplifier's sound is 50% preamp and 50% power, so this switch is responsible for a large part of a given Channel's personality and feel. The choices repeat for all 3 Channels and they are 90 W, 45, and 10 W. Using the switch is simple... just select the power you want for each Channel, keeping in mind that the greatest headroom, focus and authority will always be found in the 90 watt position. That's how to use it, but for those who want the full story, here it is.
Since 1981 Simul-Class Power has been the heart and soul of the MARK Series amplifiers, imparting its sweet, musical character onto any sound in the vast library of the now classic MARK legacy. Cleans that shimmer with transparent layers of sweet delicate highs, while the bottom end breathes a warm fundamental under a bed of rich low mid ambience. Never harsh - always fat, the Simul lead tone is the quintessential single-note solo sound that is best described with a human trait... vocal.
This patented way of wiring an output section with two (or more) pair of output tubes combines two different styles of wiring configurations to arrive at a blend that showcases the best attributes of both.
In Simul-Class, one pair of output tubes is wired in the more efficient, cooler running CLASS A/B PENTODE configuration, which produces the greater portion of power and headroom while running cooler. This was the popular way of wiring amplifiers from about the early '60's forward - chosen for its efficient use of tubes, greater power and reliability (recently a quest for the sweetest low-watt circuits triggered a resurgence of amps wired in CLASS A). The only sonic penalty for its greater power (Class A/B Pentode wiring) is that it can have a tendency to bring forward the harsher odd-order harmonic content. The Simul solution; add a pair of tubes running in the less efficient, but infinitely sweeter CLASS A TRIODE configuration. This style of wiring produces far less power out of a pair of tubes while creating more heat, but it emphasizes the even- order sweeter harmonics and transitions to clip with a soft, rich purring quality like no other.
The MARK 5 presents you with two ways to utilize this power. 90 WATTS combines the two wiring styles to deliver the maximum power and headroom. It is substantially sweeter and warmer, and is little more scooped than a standard 100 Watt amp, yet with plenty of punch and authority. 45 WATTS shuts down the middle pair of output tubes wired in CLASS AB and allows you to operate the output section in just the CLASS A mode for a perfect lower wattage range that clips sweeter and earlier, and yet is still plenty powerful enough to play out in medium sized venues.
Combining these two opposite styles of wiring in one amplifier gives you the best of vintage and modern amplifier styles. Headroom and power are there when you need it... but there is always a naturally pleasing and musically curvaceous quality to the sound that is magic to your ears and to your hands. Simul feels great and is inspiring to play!
And finally, the MULTI-WATT feature allows you to switch down to 10 watts of pure CLASS A TRIODE wired in a Single-Ended configuration. This is the ultimate low wattage output section that captures the essence of the best vintage circuits. Here, the 2nd Harmonic (an octave above the note played) is allowed to pass freely through the circuit, putting a magical halo around the notes that shines and rings with beyond-vintage soul.
These three power choices give you ultimate flexibility as to the styles and venues the MARK 5 can adapt to instantly and in fact, it's like having three separate amps in one case - each having the perfect amount of power for a different application. And when you combine the power of the separate PREAMP Channels, the combinations of EQ and the POWER options, you have the most comprehensive collection of tube amplifiers ever brought together in one chassis. That's a bold statement; but after you spend some time exploring the combinations we're sure you'll feel the same.
OUTPUT & SOLO
These two controls the overall output (volume) level of the MARK 5 when the EFFECTS LOOP switch on the Rear Panel is switched into the FX ACTIVE (switch up) position. With the EFFECTS LOOP in the HARD BYPASS (switch down) position the OUTPUT and SOLO are inactive and the overall volume levels will be determined by the MASTER control in the Channels. The EFFECTS LOOP adds a whole stage of amplification and the OUTPUT and SOLO come after this stage. The HARD BYPASS feature is intended for recording or solo playing environments where the balancing of the three channels is not so critical.
The OUTPUT control enables you to raise and lower the entire playing level of the MARK 5 without affecting the balance you have set between the Channels with the Channel MASTER.
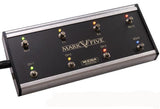
The SOLO control is a footswitchable Master Volume for the whole amp that is wired in parallel to the OUTPUT control. This allows you to dial up a preset amount of boost and switch to it when it's time to step out for solo passages or any time you want to showcase a part. Simply set your desired overall playing level with the OUTPUT, Select SOLO on the MARK 5 Footswitch and set the desired increase in volume level with the SOLO control.
NOTE: The SOLO control may only be used to increase the volume beyond the level of that set by the OUTPUT. You cannot use the SOLO to switch to a level lower than that set by the OUTPUT Control.
NOTE: Check the setting of the SOLO control before switching to it as it may be set high and cause a shocking increase in volume.
The STANDBY shuts down part of the high voltage to the power tubes so that they can rest at idle without wear. It provides a start-up procedure (follow the Cold Start procedure, wait at least 30 seconds after powering up with the POWER switch before turning the STANDBY to ON). This reduces the shock on cold power tubes and increases their life. The STANDBY is also great for muting the sound during speaker changes and should also be used to cool the amp down during set breaks or when swapping tubes.
A built-in variac is included on the POWER switch so that you may run the entire amp on a reduced voltage "brown-out" condition. This reduced voltage changes the sound and feel of the entire amplifier. SPONGY Power scoops the midrange and increases the sag to achieve a more vintage, looser, easier-to-clip character. FULL POWER (BOLD) delivers maximum headroom, focus and punch and is considered the "normal" mode of operation.
OVERVIEW: REAR PANEL
A four-position CHANNEL SELECT rotary control is provided to access the 3 Channels when the Footswitch is not connected (in the studio) or available. Simply select which of the Channels you wish to play using this control when the footswitch is not in use. When the Footswitch is to be used, select the position to the far right (when facing Rear Panel) labeled FT SW and insert the DIN connecter on the Footswitch Cable into the FOOT SWITCH jack on the right side of the Rear Panel.
A five-position rotary LOOP ASSIGN switch is provided to assign the EFFECTS LOOP to any or all of the Channels or, select FTSW to trigger the LOOP on and off with the MARK 5 Footswitch. The EFFECTS LOOP must be in the FX ACTIVE position for the LOOP ASSIGN rotary to function
NOTE:Check the OUTPUT level setting before activating the EFFECTS LOOP with the FX ACTIVE / BYPASS switch (near center of Rear Panel) to avoid damage to your ears, those of bystanders and to your speakers.
Four 1/4" EXTERNAL SWITCHING phono jacks are provided for remote control of the MARK 5 Channels, EQ and SOLO control from a master (possibly midi controlled) switcher. This feature is extremely important if the MARK 5 is to be used in a live stage set-up where all amplifiers and processors are controlled under one keystroke from a programmable master switching device.
NOTE: The four EXT SWITCHING jacks respond to standard grounding type (tip to ground) latching (not momentary) logic. This switching logic is standard on most master switching units.
The EFFECTS LOOP is fitted with a HARD BYPASS feature that removes a whole tube (two stages) and all associated circuitry from the signal path for the purist who insists the most direct path to tone in the studio. When the EFFECTS LOOP is activated by switching to LOOP ACTIVE (switch up) there is an adjustable SEND LEVEL control to assure optimum performance with your processing devices.
NOTE: Remember that the HARD BYPASS removes the OUTPUT and SOLO controls from the signal path and the individual Channel MASTER controls become the overall volume level controls.
Individual REVERB controls for each Channel allow you to set the desired mix of the rich all-tube Reverb effect for each Channel without compromise. The REVERB effect can be taken in and out of the signal path with the REV button on the MARK 5 Footswitch.
A PENTODE / TRIODE mini toggle switch (located just under the CH 3 REVERB Control) allows you to choose the wiring configuration of the middle pair of power tubes in Channel 3 only. This is a feature that was popular on the MARK 4 and changes the personality of the attack and liquidity of the sound in the higher gain condition found in Channel 3. PENTODE produces a bolder, tighter voice that has a more pronounced midrange curve and is excellent for adding percussive authority to lower gain single note solo sounds. TRIODE softens the attack and scoops the mids a bit to create a more liquid, legato feel that really shines for high gain styles and faster playing.
Switchable Rectifiers makes its debut on the MARK Series for the first time here on the FIVE in the form of Rectifier Tracking. Channels 1 and 2 are fitted with individual mini toggles (located under the Channel 1 and 2 REVERB Controls) that allow you to choose between the tight, bold - higher headroom response of Silicon DIODES or the saggier, sweeter low-output looseness of TUBES in the 45 Watt Power setting only. The 90 Watt setting automatically selects the Silicon Diodes and the 10 Watt setting requires the Tube Rectifier to operate safely.
Two 8 and two 4 Ohm SPEAKER OUTPUTS are provided and with these jacks almost any speaker cabinet configuration can be accommodated. The MARK 5 is not overly sensitive to impedance mismatches, so feel free to experiment with different cabinet schemes without fear of damage to your amplifier. Different loads will change the response, possibly to your liking. An 8 Ohm load will produce the punchiest, tightest sound and the maximum headroom. Keep in mind that the (power) tube life will be increased by running either an 8 or 4 Ohm overall load.
A 1/4" TUNER OUTPUT is provided and a SILENT TUNING feature has been incorporated so you can tune the instrument onstage without bothering the band or audience. Simply connect your favorite tuner and tap the TUNE the button on the MARK 5 Footswitch and all sound to the Speaker Outputs is muted.
A SLAVE OUTPUT and SLAVE LEVEL Control allows you to capture the full sound of the MARK 5, both preamp and power section, for a feed to processing racks and/or additional power amps (perhaps MESA Stereo Rack power) for big venue applications.
NOTE: Always start any SLAVE hook-up procedure by zero-ing out the SLAVE LEVEL Control to avoid possible damage to your speakers or your ears! In fact it is good practice to leave the SLAVE LEVEL Control set to 7:00 (OFF) when it is not in use to avoid accidents.
The FOOT SWITCH DIN jack (female) is conveniently located on the right side of the Rear Panel and accepts a 8 pin male DIN cable. Connect the MARK 5 Footswitch here.
The Cooling Fan is fitted with an ON/OFF switch to allow silent running in the studio or late night practicing in the lower wattage settings. We recommend leaving the FAN on whenever possible to increase the toneful life of your power tubes. Basically, if the sound doesn't bother you... leave the Cooling Fan on all the time.
Finally a BIAS SELECT switch is included that allows you to run EL34 power tubes in place of the stock compliment of 6L6"s. The EL34 style tubes will produce a brighter, skinnier sound that will clip with a whole different harmonic content that can be nice, especially for recording where you may not need the Channel switching performance of all 3 Channels and can dedicate the amplifier to one specific sound. The 6L6'S will most likely perform better for a wide range of sounds and certainly sound fatter and richer on most all the sounds and produce the greatest clean headroom. Whichever tubes you prefer, MAKE SURE THE SETTING OF THE BIAS SWITCH MATCHES THE TUBES IN USE!
NOTE: ALWAYS CHECK THE BIAS SWITCH AFTER SWAPPING TUBES AND EVEN AFTER TRANSPORTING YOUR AMPLIFIER! THE BIAS SWITCH MUST BE SET FOR THE TUBES IN USE!


